Role Examples and Permissions
When the Administrator creates a role, s/he determines what areas within a Target or Integration the user can access. One user may have access to read certain data, while another user has access to read and edit the data.
If you want to restrict access at the Workstream level, the Administrator needs to set permissions within the Deal. Roles and Permissions are described below.
Roles
Pre-defined Roles – default roles available in your M&A instance.
- Read-Only – means that the user assigned to this role can read the data within the system
- Full Rights w/o Delete – a user assigned to this role has full rights to the system – they can read, update and create data…they just can’t delete data.
- Full Rights – the user with this role has full rights to the system…they can read, update, create and delete data.
Sample Roles – Below are samples of different types of Roles that you can add to your Production site. Keep in mind that you will need to determine which features you want these roles to have access to. Screen Capture 1 depicts a partial list of the features.
- HR Lead – access could be read, update, create, and delete to selected features. Per the below screen capture, this role does not have access to the Due Diligence and Stream tabs.
- HR Member – access could be read, update, and create selected features.
- Legal Lead – access could be read, update, create, and delete selected features.
- Legal Member – access could be read, update, and create selected features.
- Program Manager – access could be read, update, create and delete selected features.
- Team Lead – access could be read, update, and create selected features.

Permissions
To hide Integration data at the Workstream level, you need to go to that Workstream and assign two (2) types of permissions. The first, is that Everyone doesn’t have access to the Workstream, and the second permission is for the HR Lead Role or IT Lead Role to have access to that Workstream. To do this:
- Open the Integration.
- From the Activity Map or the Workstreams view, click on the title of the Workstream, e.g. HR, vs. the Edit Pencil icon.
- Scroll to the Access Permissions section.
- Click on +Create.
- In the Access Permissions window, click in the Role drop down menu and choose Everyone.
- Leave the permissions empty, e.g. do not select Read, Update, Delete.

- Press Save.
- The Permission “Everyone” has been created and is displayed in the Access Permissions section. This means that everyone in the system DOES NOT have access to the Workstream. Step f explains how to give access to a certain role, e.g. Human Resources.
- Press +Create to create a permission for the role that should have access to the Workstream.
- In the Access Permissions window, choose the Human Resources role.
- Choose Read and/or Update and/or Delete.
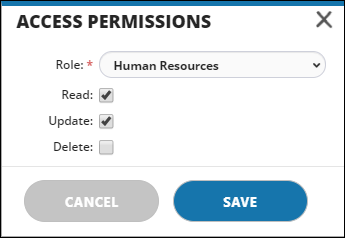
- Press Save.
- In the Access Permissions section, you will see two roles that have been defined—
Everyone and Human Resources. This means that those users that are assigned to the Human Resources role will have access to the HR Workstream.

Best practices suggest that the Administrator test roles and permissions using a test user account.
