How to Create a Workstream in a Target
Creating a Workstream in a Target
A workstream represents a set of key activities within a single or across multiple functional teams. When a new workstream is created, it is important to define the Owner and their Functional Team. Keep in mind the Owner assignment is the individual who has the duty of completing any given hierarchy level work assigned, i.e. typically a Task. They are ultimately answering to the person identified in the Responsible field.
Create New Workstream
- Navigate to the Targets menu.
- Select the name of the Target under the Target Name or Code Name column.
- From the Tab Bar, select the Workstreams tab.
- Select the Create button.

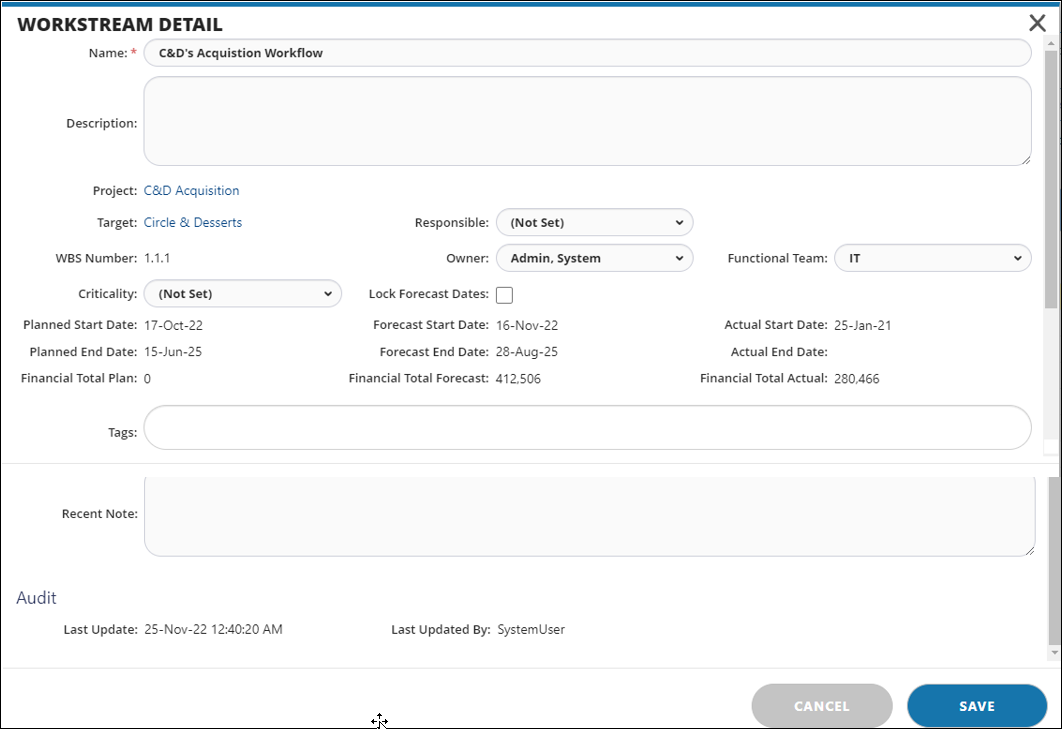
- The Workstream Detail window appears.
- Provide a short name in the Name field and fill in the remaining fields as follows:
- Description: A more detailed description of the Workstream.
- Project: To associate a Workstream to a Project, this field must be completed by selecting a Project from the drop-down menu.
- Target: The Target name is displayed via an interactive link.
- Responsible: This assignment is the individual with the high-level oversight and responsibility to see that the assigned Owner completes the work at the hierarchy level assigned accordingly. Select a name from the drop-down list who will serve as the Responsible party.
Tip:
- Owner: The individual who has the duty of completing any given hierarchy level work assigned. They are ultimately answering to the Responsible Role. Use the drop-down menu to choose a name.
Tip: If the person is not listed in the drop-down list it means s/he was not added to the team.
- Functional Team: Auto-populates based on the owner that is selected.
- Criticality: Select whether this is a Critical Path, High, Medium or Low.
- Lock Forecast Dates: Clicking this box will allow you to lock the dates for this activity, preventing others from altering the forecast or allowing it to be changed by altering dependent activities.
- Date fields: There are three types of dates in all activities within Devensoft M&A which are Planned, Forecast, and Actual. Planned Dates are the baseline schedule. Once these are set they should not be changed. Forecast Dates are revisions to the schedule and these world reflect the most current information. Actual Dates are used to indicate when an activity has started and ended.
- Planned Financial Value: Financial tracking is a powerful feature within Devensoft. If you want to track financial targets, you should think about using this field to indicate an initial expectation on the economics of this workstream.
- Financial Value: This can be in the form of synergy or cost.
- Tags: Users can add tags to Workstreams for filtering purposes and are available on selected reports. Examples of tags are Day1, Day100, etc.
- Recent Notes: You can add notes to act as reminders or be created to share new information.
Once the values are entered, click Save to add this workstream to the Target.

